

 ΕΛ
ΕΛProduct Information
EMAIL SETTINGS – SERVER SELECTION
The eTameiaki application has been created not only to issue your receipts easily, but also to be able to send automatically, without any additional process, all or some of your invoices, to your accountant or to you. At the same time, AADE is also automatically informed via the My Data application.
All you have to do is proceed with the relevant settings by following the steps below:
EMAIL SETTINGS #
From the Options Menu, we are transferred to Email Settings, via the relevant option.
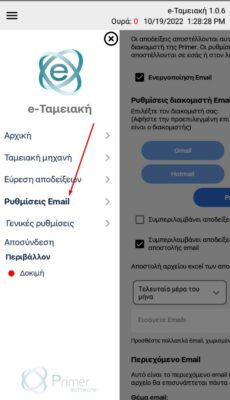
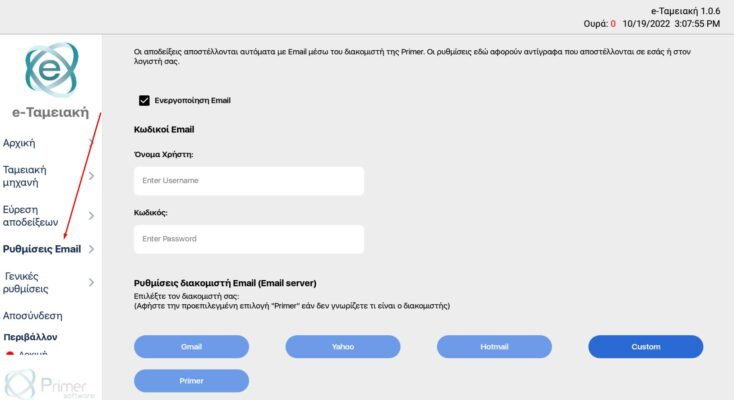
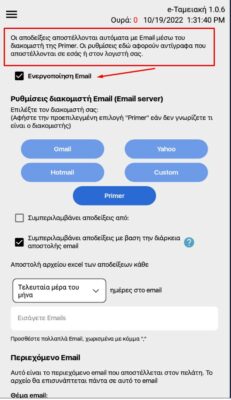
By “clicking” on the Enable Email field, you activate the automatic sending of copies via email to you and your accountant.
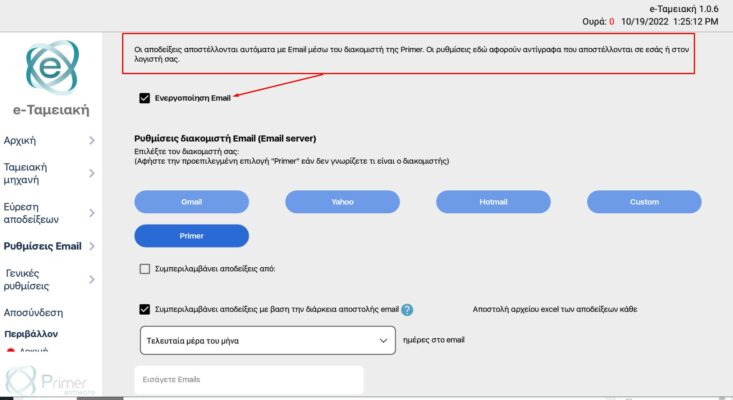
TABLET SCREEN
SERVER SELECTION #
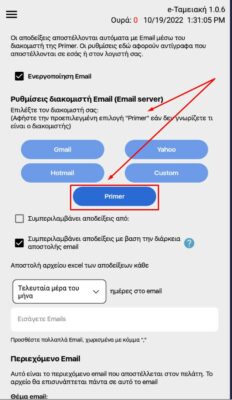
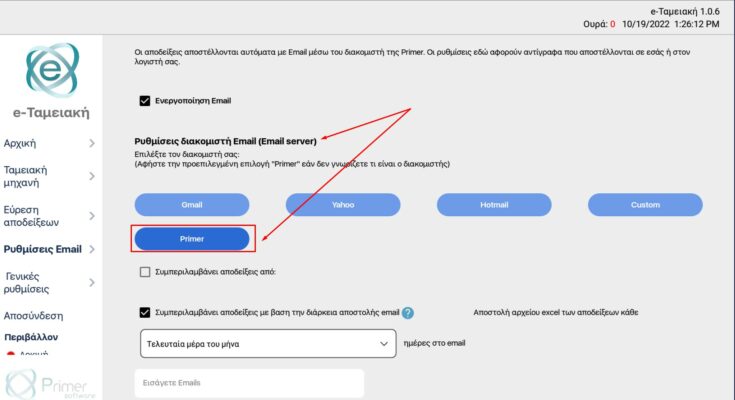
In this step, you must select the server through which the emails will be sent.
PRIMER SERVER #
The Primer server is set as default. In case you do not know your Email Server and the necessary details that will be asked of you in the steps analyzed below, you can leave the Primer Server selected and proceed to the next settings.
TABLET SCREEN
GMAIL, YAHOO, HOTMAIL SERVERS #
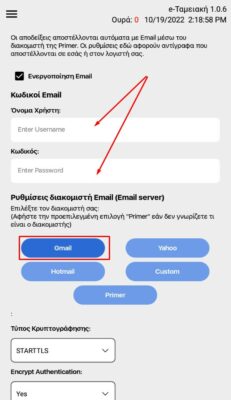
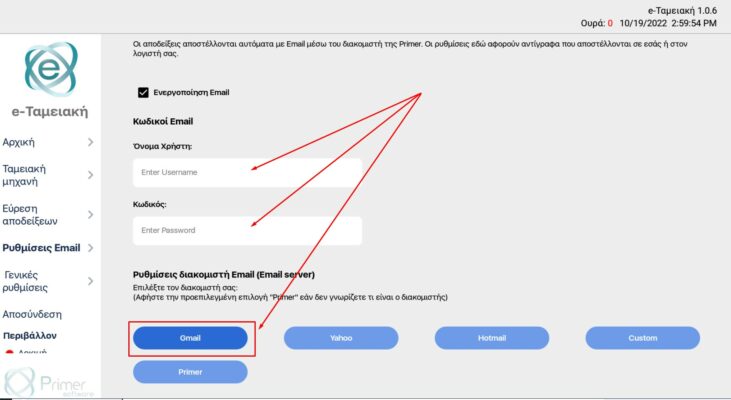
In case you wish the emails to be sent via the mail server of your choice (GMAIL, YAHOO, HOTMAIL), you will select the corresponding server from the available options and you will be asked to enter the Username and User Password, that you have set in your mail server, in the corresponding fields that appear.
MOBILE SCREEN
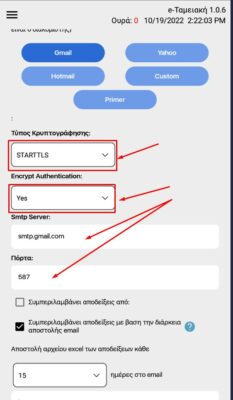
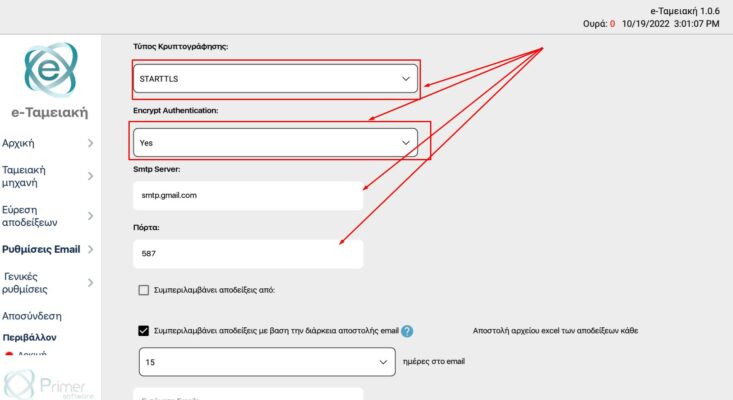
Then, some additional fields appear that require completion:
- Encryption Type (by clicking the arrow all available options are displayed)
- Encrypt Authentication (we select YES or NO)
In the cases of Server Gmail, Yahoo, Hotmail the immediately following fields (Smtp Server and Port) are pre-filled and appear automatically, for your convenience (we recommend not to change the pre-filled content).
TABLET SCREEN
CUSTOM SERVER #
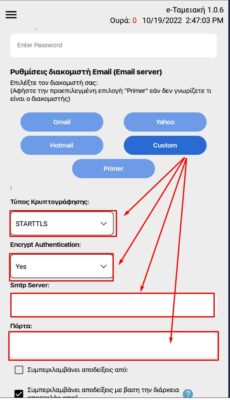
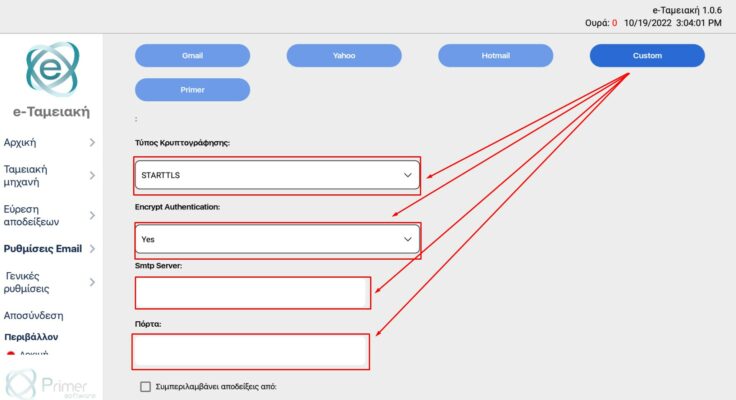
If your Email Server is not one of the above available, you will select Custom Server. In this case, you must define all the fields of the Server’s characteristics, such as:
- Encryption Type (by clicking the arrow all available options are displayed)
- Encrypt Authentication (we select YES or NO)
- Smtp Server
- Port
Please select sending via custom server only in case you know all the required details and are sure about their correct completion, otherwise the email sending service may not work properly.
MOBILE SCREEN
SETTING THE INTERVAL & FREQUENCY OF SENDING EMAILS #
The frequency as well as the calendar range of the file of receipts that will be sent automatically by the application, are defined by you with the following settings:
CALENDAR SETTINGS #
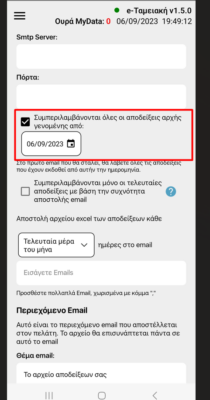
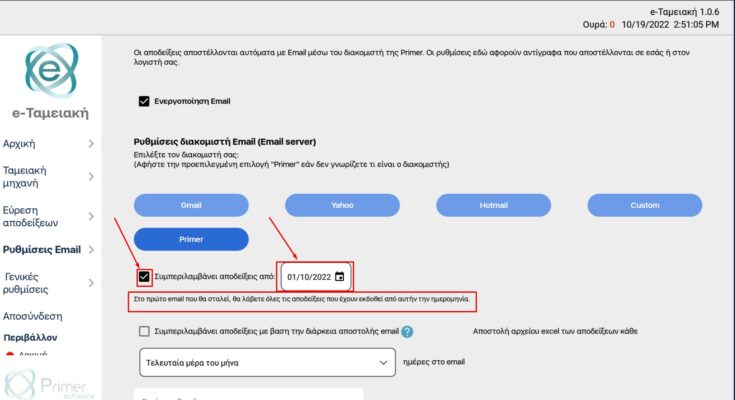
By “clicking” on Includes receipts from : and pressing the date button we define through the calendar the date of the first issued receipt that will be included in the sending file.
ATTENTION! This definition of the sending file will send a file that will include all receipts from that date until today.
e.g. If we set an older date 01/05/2022 as the date of the first receipt, then our file will include the invoices from 01/05/2022 until today
MOBILE SCREEN
TABLET SCREEN
SELECTING THE FILE SENDING FREQUENCY #
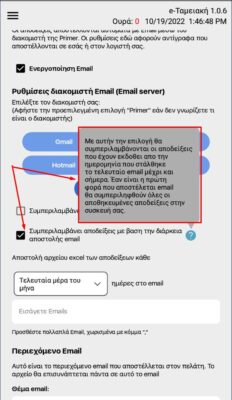
The frequency with which you want the application to automatically send the receipt file can be set by “clicking” on the Includes receipts based on email sending duration. With this option (as also shown in the message), our file will include all receipts issued from the date the last email was sent until today, i.e. we define a specific periodic interval at which we want the emails to be sent (e.g. per day – in which case the receipts of the last day will be sent, per week – in which case the receipts of the last week will be sent, per month – in which case the receipts of the last month will be sent, etc.)
MOBILE SCREEN
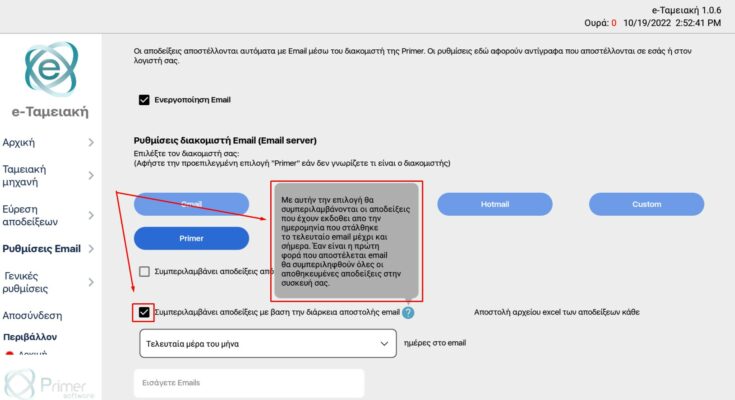
When we “click” on the bar with the arrow, all the options we have regarding the frequency of sending the receipt file by email will open.
e.g. Daily, every 5, 15, 30 days or the last day of each month
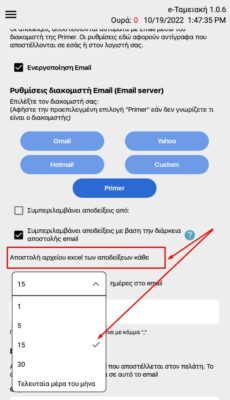
MOBILE SCREEN
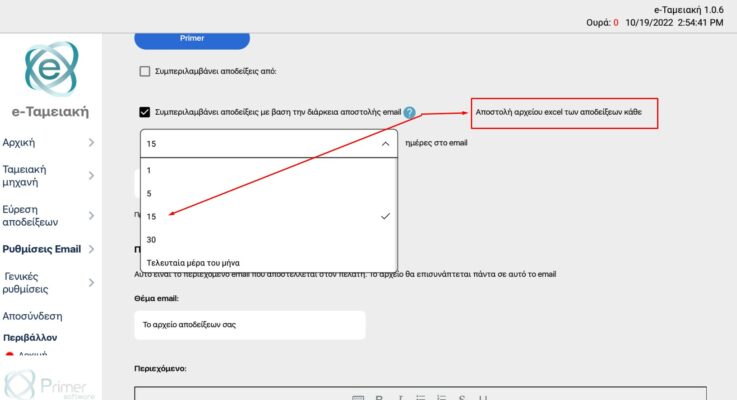
TABLET SCREEN
SETTING RECIPIENT ADDRESS #
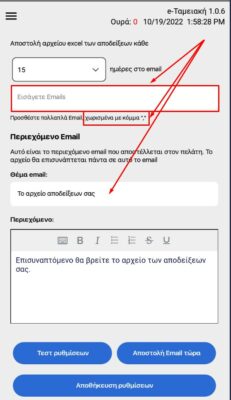
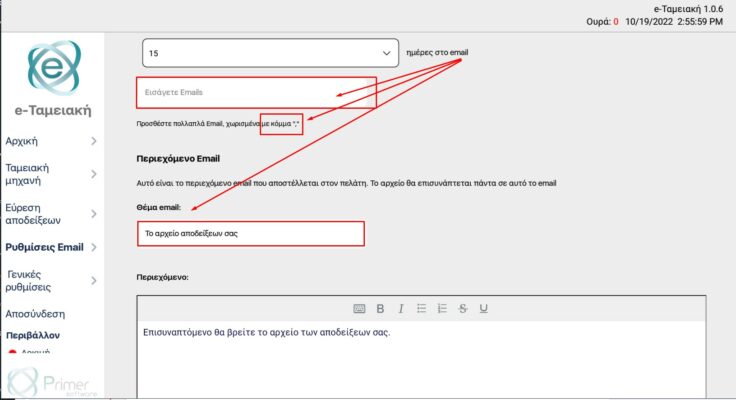
By filling in the Email Entry field with the address of our choice, we define the recipient of the emails. In case you wish the email to be sent to more than one recipient (e.g. to you and your accountant) you must enter both addresses in the same field.
ATTENTION! Between the email addresses entered as recipients, you must always put a comma (,)
SUPPLEMENTARY EMAIL CONTENT #
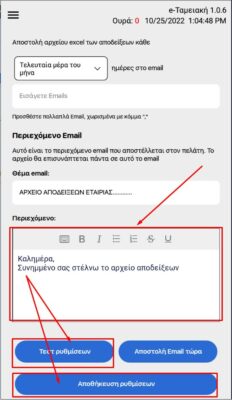
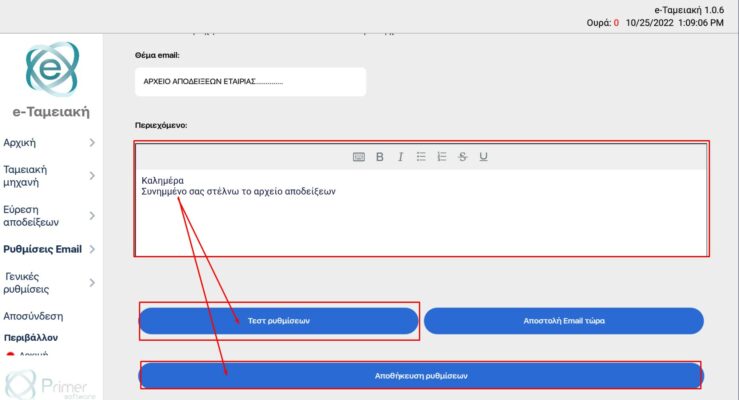
In these fields we define the Subject that the sent email will have each time and the Content of the message that the recipient will receive.
Regarding the Subject, we recommend that you choose a distinctive element that concerns you, so that it is easy to search for it in the future if needed, either by you or by your accountant. (e.g. Sending receipts of company ____ or company VAT number)
Regarding the Content, you can write a template message that will accompany the attached receipt file each time, to facilitate your communication with the recipient of the message. (e.g. Good morning, attached you will find the receipt file for the last month for the business _____).
TABLET SCREEN
CHECKING EMAIL SENDING #
To check if the settings we have selected are correct and the email is sent properly, we can temporarily enter our own email as the recipient email and click the Test settings button to receive a confirmation email of the test sending.
Once the test email is sent successfully, we select Save settings and all the settings that have been entered in the previous steps will be saved, so that based on them the future sending of the receipt files will be done.
IMMEDIATE SENDING OF RECEIPT EMAIL #
The application offers you another very important capability!
In case you need (e.g. because it was requested by your accountant) to send immediately – at the moment it is requested and not with the frequency you have previously set – the receipts of a specific time period, you have the possibility to do so by clicking the Send email now. All you need to do is define the time period of the receipts you need the immediately sent file to include, enter the recipient’s email address and click this specific button.
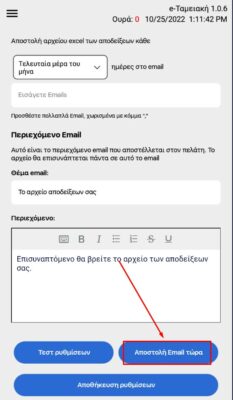
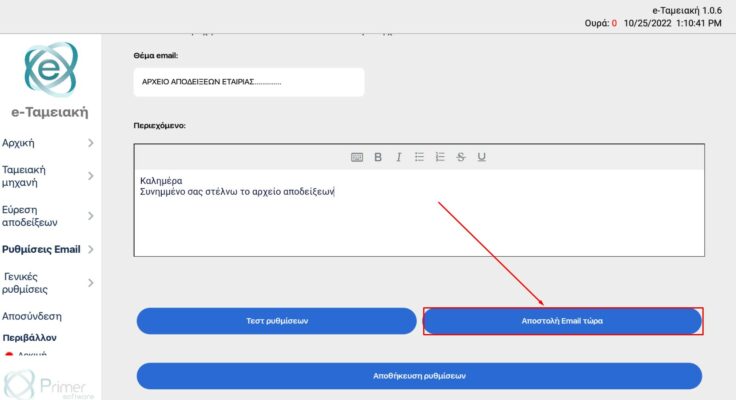
ATTENTION! If, in order to use the Send email now function, you changed your saved settings (sending frequency, recipient, etc.) do not forget to restore them so that they are saved again.