
 ΕΛ
ΕΛUsage-Installation Instructions

CONTENTS
1.1 Downloading the Plugin
Before installing the Plugin, you will need to download it from the Primer website. The file that will be saved is in zip format.
You do not need to open the file at first, just know where it is saved and it will be used later according to the instructions that follow.
1.2 Uploading the Plugin to WordPress
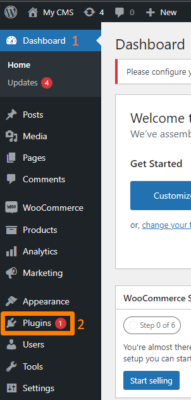
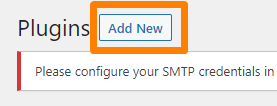
Opening the WordPress of your page, the first step is to open the Dashboard. Once it opens, a menu will appear as shown in the photo below. There you select “Plugins”. And immediately after on the new page that has opened, you select “Add New”.
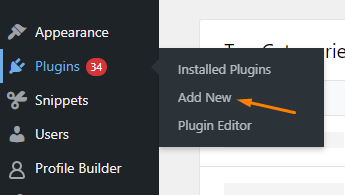
Another way to add a new Plugin, while you are on the Dashboard, is simply by hovering the mouse over “Plugins”, it automatically displays a new menu and there you can also click “Add New”.
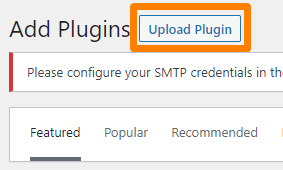
Once you have clicked “Add New”, the following page will appear and there you select “Upload Plugin”.
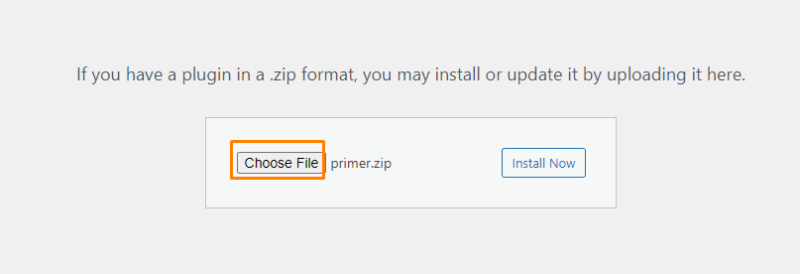
To upload the Plugin to WordPress you need to select “Choose File” and this is the point where the .zip file you previously downloaded from the primer site will be used. By selecting the file at the point where it is saved depending on your device, with “Install Now” the upload will take place.
If you get an error message for exceeding the maximum file capacity (you are trying to upload a file larger than 5Mb), please contact your provider.
To be able to find “Primer My Data” in your Plugins list, once the upload is done you will select “Activate plugin” and it will be available for use.
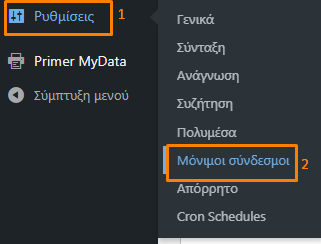
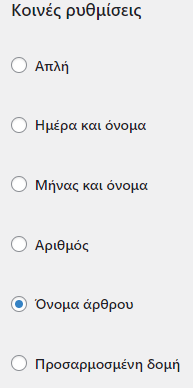
(Make sure in Settings/Settings in the WordPress Dashboard, by clicking Permalinks from the list that appears, that Post name is selected in case any problem occurs during the Plugin installation.)
1.3 Activating the Plugin
Having correctly uploaded the Plugin with the instructions given in the previous sections, in the WordPress Dashboard in the left list a new tab “Primer MyData” will also appear. As sub-tabs you will see “Orders”, “Invoices”, “Settings” and “License and General Settings”.
To activate the Plugin you need to select “License and General Settings” and the following page will appear.
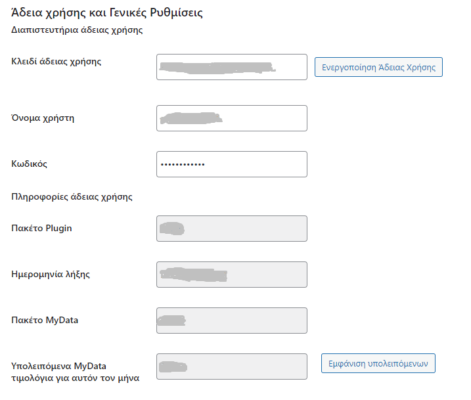
With the purchase of the Plugin from the primer site along with the zip file, you have been sent the serial number for its activation, a username and a password.
The serial number that has been sent to you must be in the “License key” field. Then fill in the username and password given to you in the respective fields. Once the above fields are filled in, select “Activate license”, so that your details are verified.
The “Plugin Package” and “MyData Package” show the type of package you have chosen to purchase and the “Expiration date” informs you about the remaining duration of your subscription. The “Remaining MyData invoices for this month” informs you about the number of invoices you still have available for issuing, depending on the subscription package you are using.
1.3.1. First activation of the Plugin – Signing of contract
For the first activation of the Plugin, once you have typed the serial number, the username and the password, by clicking “Activate license” the details you have provided will be checked. Once this action is completed, a new page with the Terms of use of the Plugin will appear. By selecting “Accept” the process of activating your business will proceed by displaying the following page.
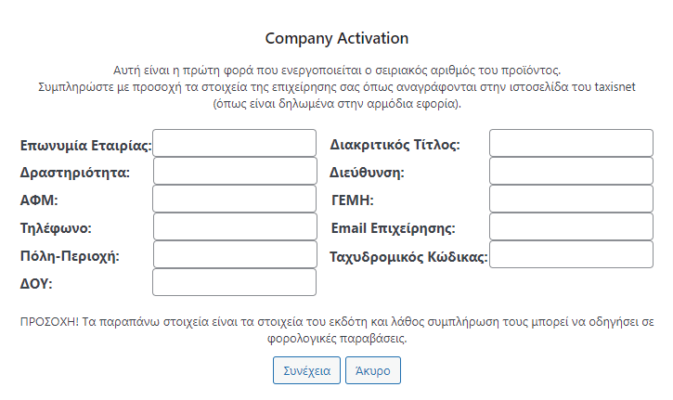
In the above fields you fill in your details, the name of the business, the distinctive title, the activity of the business, the address of the headquarters, the VAT number, GEMH number, phone and email of the business, region, postal code and Tax Office. Once these are filled in, select “Continue” for the next step.
The following page will appear, asking for the first and last name of the legal representative of the business (issuing business) as well as the VAT number.
The above details are necessary for the MyData contract between the issuing business and the provider Primer Software.
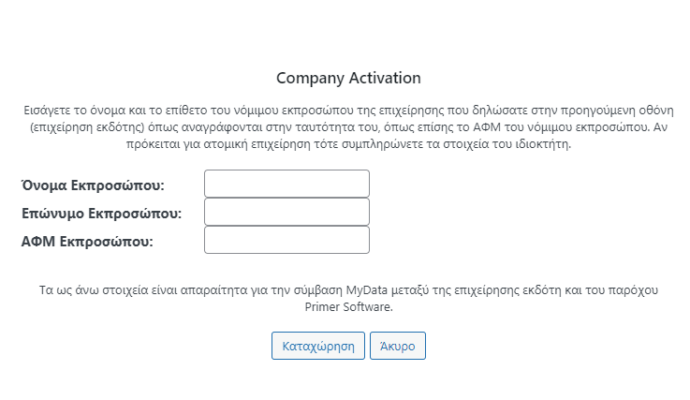
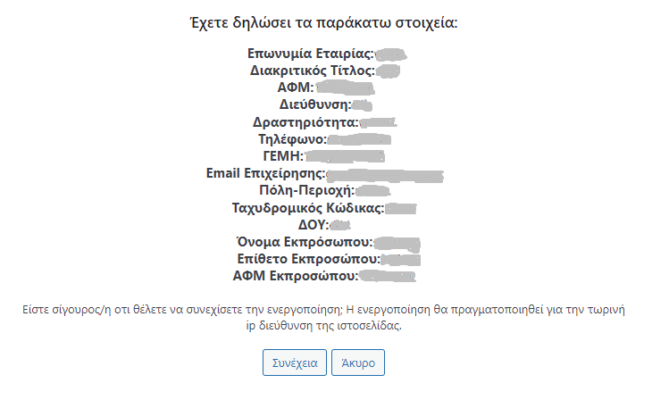
Once these are filled in, select “Submit”. A confirmation page will appear with all the details you have already submitted which should match those displayed in the business image on Taxisnet and you select “Continue” to complete the process of activating the new business.
Method 1 (available from 17.12.2021):
After the passage of one working day you will need to enter the gov.gr website (digital certification of private agreement) and then selecting “Pending” at the address https://www.gov.gr/ipiresies/polites-kai-kathemerinoteta/psephiaka-eggrapha-gov-gr/psephiake-bebaiose-idiotikou-sumphonetikou to accept the contract.
The acceptance of the contract takes place once and is necessary for the process of connection with a provider to proceed.
Once the acceptance has taken place, after the passage of one working day, you will open the following link https://www1.gsis.gr/taxisnet/mytaxisnet/protected/authorizations.htm?tab=r in the AADE application and you will Log in with your credentials. Then, you will go to the authorization management (at the bottom of the screen), and you will create a New Authorization to an Electronic Invoicing Provider by selecting Primer as the MyData provider with the VAT number 800566476.
After checking the process by us and accepting the provider request, the completion of the first MyData activation will take place and you will be able to start issuing your invoices.
Method 2:
Download the contract from the link below https://primer.gr/wp-content/uploads/2021/11/%CE%A3%CF%8D%CE%BC%CE%B2%CE%B1%CF%83%CE%B7-%CE%A5%CE%A0%CE%91%CE%97%CE%95%CE%A3.pdf and fill in the necessary fields, stamp it with your company stamp and it is signed by the legal representative by filling in the name and VAT number in full. Once these details are successfully filled in, you will send the file to the following email: contracts@primer.gr. Then, you will open the following link https://www1.gsis.gr/taxisnet/mytaxisnet/protected/authorizations.htm?tab=r in the AADE application and you will Log in with your credentials. Then, you will go to the authorization management (at the bottom of the screen), and you will create a New Authorization to an Electronic Invoicing Provider by selecting Primer as the MyData provider with the VAT number 800566476.
After checking the process by us and accepting the provider request, the completion of the first MyData activation will take place and you will be able to start issuing your invoices.
1.3.2. Existing user
If you have purchased a MyData product from our company you are considered an existing user.
For the existing user, you need to type the serial number, the username and the password in the respective fields and immediately the user’s details will be filled in automatically after checking the details.
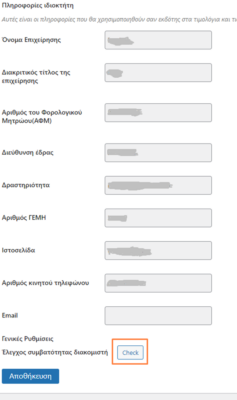
You will always need, with every new renewal, having checked that the details listed are correct, to use the “Server compatibility check” by clicking “Check”, to make sure that everything is “Success” so that AADE can accept the invoices. If you want to change any of the user’s information, do not hesitate to contact us by email at support-plugin@primer.gr writing your username and the new details of your business. With “Activate license” the product has been activated.
1.4 SMTP Configuration
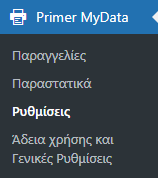
To configure the email, select “Settings” in the subcategories of “Primer MyData” from the left list as shown in the image below and a new page will appear where you will select “Email Settings”.
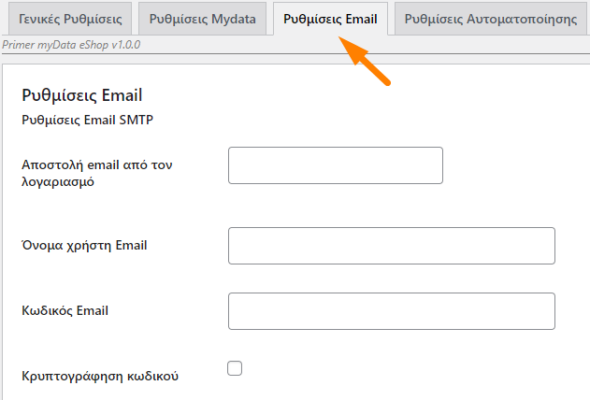
You will need to contact the company that provides you with the mail and ask for the following details:
Email UsernameEmail PasswordEncryption TypeSMTP ServerPortand these to be filled in the respective fields where requested.
Also once the above are filled in, you can personalize the settings for the emails that will be sent to customers by putting either a specific subject or making changes to how the main body of the email will appear.
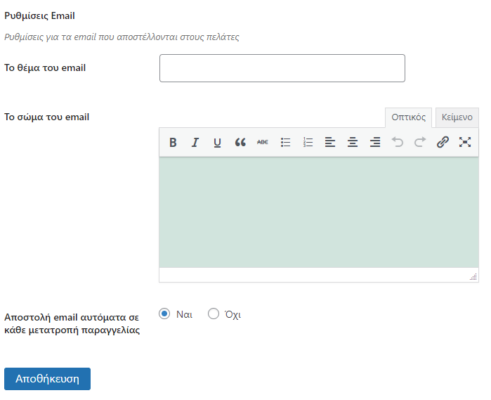
Once everything has been filled in, with “Save” the settings are saved and the configuration is complete.
1.5 Test issuing of receipts
Once the steps of uploading the Plugin and configuring the email are done, you are given the possibility to test issuing receipts.
This is done by selecting “Settings” from the left menu and in “MyData Settings” you will look for the field that says “MyData API”. There are two options given, having the “Production API” as default, but for the tests you will need to select the “Test API” and immediately after “Save”.
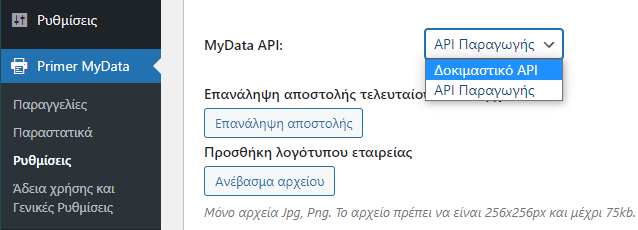
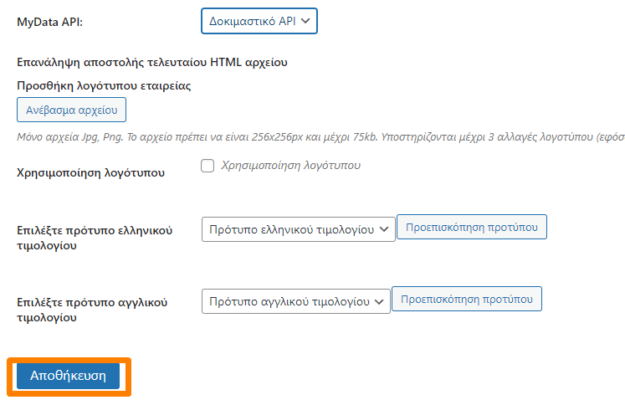
Once the change has been made to “Test API”, you are now given the ability to place an order from your WooCommerce and once this is done your order will appear in “Orders” in the subcategory of “Primer MyData”.
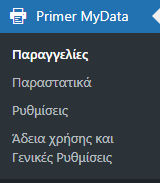
Opening the “Orders” page shows you the latest orders that have been made in your online store. Search for the last test order, select it and click “Issue invoices for the selected orders”. This option issues the invoice for the specific order(s).

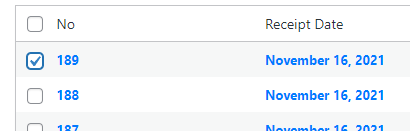
From “Invoices” in the left menu you can see the list of your invoices that have been issued and by selecting each invoice separately by clicking on its details, you are given the ability to view it, so that there can be an image of the final result and via the “Settings” subcategory in the Plugin, to make changes in the appearance.
Also by selecting either one or more invoices you can send them by email, to see the process of sending by email and the appearance of the email. There is also the possibility to download the invoices to your device.
CONTENTS
- 1. INTRODUCTION
- 2. LICENSE AND GENERAL SETTINGS
- 3. Settings
- 3.1 MyData Settings
- 3.2 General Settings
- 3.3 Email Settings
- 3.4 Automation Settings
- 4. Orders
- 5. Invoices
1. INTRODUCTION
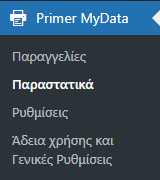
Having installed the Plugin, in the WordPress Dashboard the “Primer MyData” appears. By clicking on it, the following four subcategories will appear.
“Orders” for managing orders, “Invoices” for managing invoices, “Settings” for changing settings and “License and General Settings”, which concerns information and management of the product’s license, as well as information about your business.
2. LICENSE AND GENERAL SETTINGS
By selecting from the left list the button “License and General Settings” the following page appears.
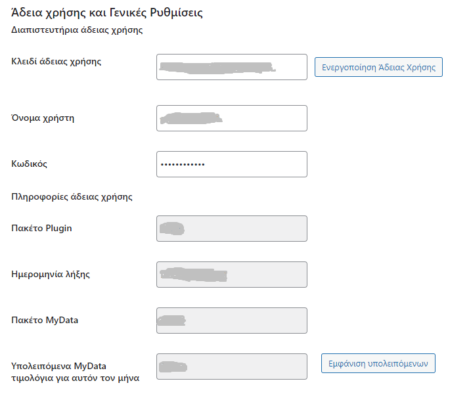
At the top of the page are the “License credentials”, which are fields that have already been filled in with the installation of the Plugin and its activation. The License key, the username and your password are sent at the beginning of our cooperation. The License key is the serial number, which activates the use of the Plugin, depending on the version you have chosen, your unique username and your personal password.
Then, the “License information” appears, which is the general information for each version of the product. The “Plugin Package” refers to the version code you have chosen, and with the “Expiration date” option you are provided with information about the expiration date of your subscription.
The “MyData Package”, respectively, informs you about the MyData package, which has been selected. Also, you are notified of the quantity of invoices, which you can issue for the specific month we are going through via the “Remaining MyData invoices for this month”. The “Show remaining” proceeds to a refresh to show you the final number of invoices remaining at any given time.
The information of your business follows.
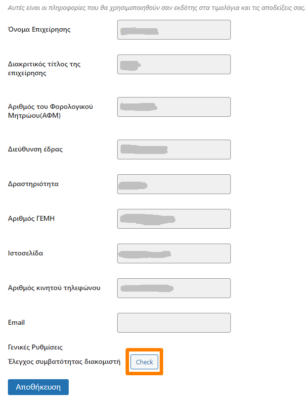
In the fields the information referred to is:
- the name of the business
- the distinctive title of the business
- the Tax Identification Number (VAT)
- The address of the business headquarters
- what the company is engaged in
- the GEMH number (General Commercial Registry)
- the website of the business
- the mobile phone number
- the email address
With every renewal of the subscription, the use of “Server compatibility check”, by clicking “Check”, is necessary to check all the specifications, which are necessary in order for the invoices to be accepted by AADE.
3. Settings
3.1 MyData Settings
By selecting from the left list as a subcategory of “Primer MyData”, the “Settings” option displays the following page, which concerns “MyData Settings”.
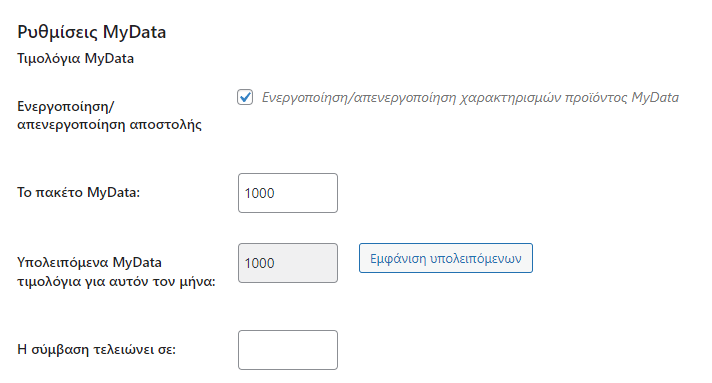
At the beginning of the page you are shown information about the MyData package you have chosen and the remaining invoices.
In the continuation of the page appears the way you want the numbering to be done in the next invoices. The default option is to start all from number 1. However, it is possible to start the numbering from the number you want, for each type of invoices used in your business.

The MyData API which has two options, the “Production API”, which sends the invoices to the AADE production and the “Test API”, which gives you the possibility to test the issuing of your invoices, having an image of the final form of the invoice, in order to proceed with the appropriate configurations.

For the invoices to be sent to AADE, the “Production API” must always be selected and only in test cases to change.
In addition, the possibility of resending the HTML file is provided, with the “Resend” option, in case of need, due to a problem with the first sending. This option will appear only when an error occurs in the first sending of the HTML file.
Scrolling down, the formatting settings for the company logo appear.

With “Add company logo”, the image is added from your device, by clicking “Upload file”. You must use only .png or .jpg files and size up to 75kb. Up to 3 logo changes are supported (once “Save” has been clicked).
The “Use logo” is preset, so that your business logo appears on the invoices. This option, however, is canceled by deselecting the checkbox.
Then, the possibility of viewing the invoice template is given, by clicking “Template preview”, so that you have the image of your invoices and configure them as you wish.
Any change at the end must be confirmed with the “Save” button, in order to be saved in the system.
3.2 General Settings
To enter the General Settings tab, once the Settings button is selected in the left menu, select the «General Settings» indication from the top tab.
In the general settings 2 options are given:
- Enable receipt/invoice option on the payment page
- Create/update new user on the payment page
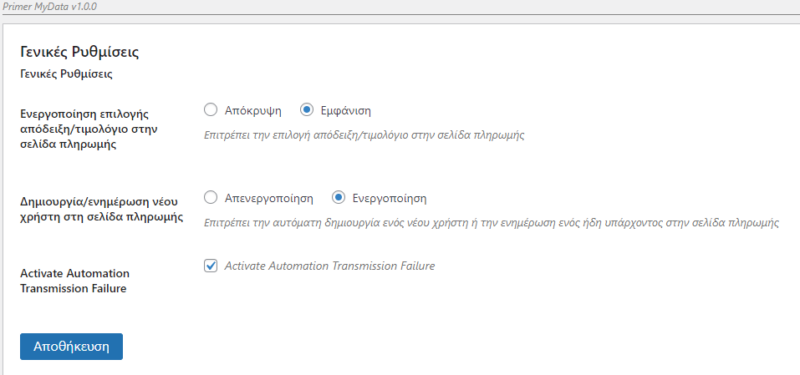
The “Enable receipt/invoice option on the payment page” is the activation of the options, during the customer’s order, between receipt or invoice. When “Hide” is selected, the receipt appears as the only invoice option, while when “Show” is selected, the customer will be allowed to choose between a receipt and an invoice.
In “Create/update new user on the payment page”, with the “Enable” indication the customer is allowed to create a new user or update the details in an existing account. On the contrary, with the “Disable” indication, this possibility is withdrawn.
3.3 Email Settings
For the configuration of the Email, select “Settings” in the subcategories of “Primer MyData” from the left list, as shown in the following image. On the new page that will appear, you will select “Email Settings”.
It is necessary to contact the company that provides you with the mail, and ask for the following details:
Email UsernameEmail PasswordEncryption TypeSMTP ServerPortwhich must be filled in the respective fields.
Once the above are filled in, by clicking “Test Email Settings”, a test email will be automatically sent to the email address you have selected.
Also, once these are filled in, you can personalize the settings for the emails, which will be sent to customers, noting either a specific subject or writing in the main body of the email.
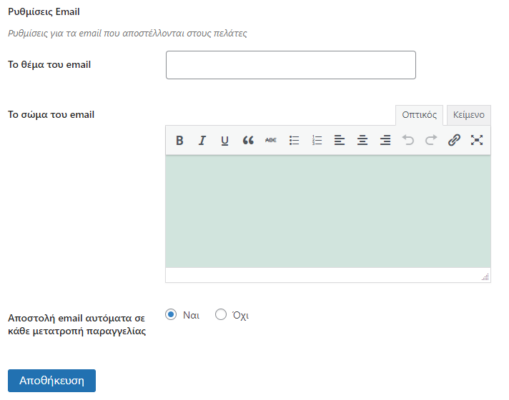
Once everything has been filled in, with the “Save” button, the settings are saved and the configuration is complete.
3.4 Automation Settings
The possibility for Automation Settings is also given.
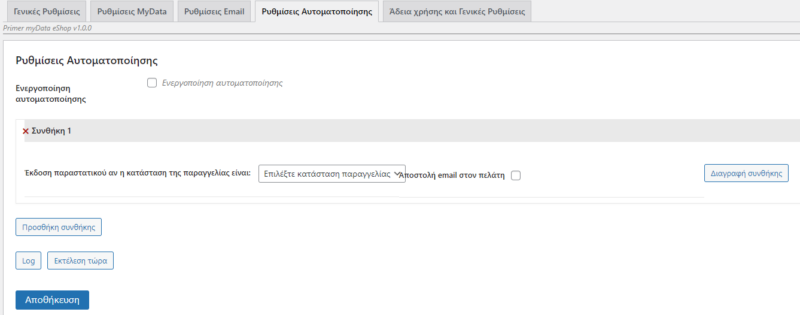
The default state is for Automation to be disabled. However, you can, once you create some conditions you want by clicking “Enable Automation” to make it active. Initially, to create a new condition you must click “Add condition”. This action will immediately display the following image.
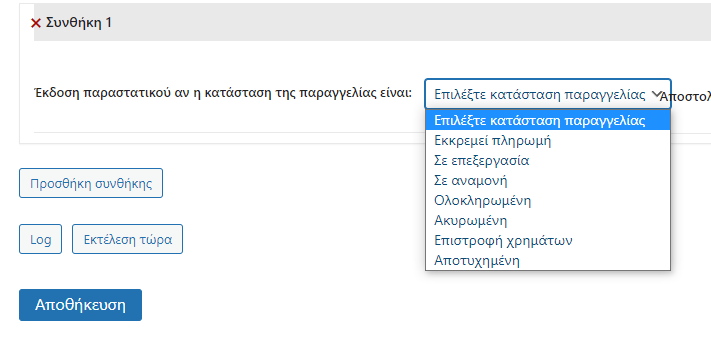
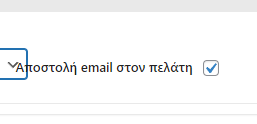
You can set as a condition every time the order status is in one of the above states, to send an email directly to the customer. This is done by ticking “Send email to customer”. The possible states of an order are: pending payment, processing, on hold, completed, cancelled, refunded and failed.
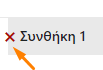
To delete the condition, select “Delete Condition”. Alternatively, select the delete sign next to the condition, as shown below.
It is possible to simultaneously activate more than one condition.
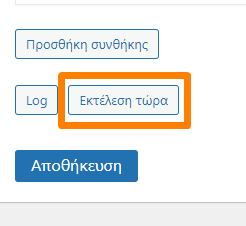
Once the conditions you have created are ready and the automation is activated, select “Save”. Also with “Run now” you can run the automation whenever you want.
4. Orders
To enter the order management, we select from the list on the left “Orders”. A page will immediately open with all the orders you have received. At the top of the page are the filters, which will help you for better management and search of orders.
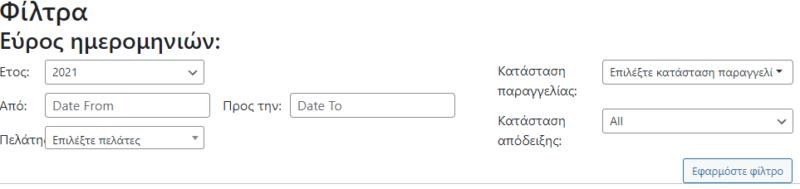
These filters give the possibility to search for orders according to the date they were made, to show orders that have taken place within a certain period of time, orders according to a specific customer, search for orders according to the status of the order and according to the status of the receipt. You can select more than one filter and by clicking “Apply filter” the results will be displayed.
By clicking on one of the details of an order in the list, a new page opens which allows editing from WooCommerce.
By selecting one or more orders (by ticking the appropriate box next to the order), you can issue them by clicking “Issue invoices for the selected orders”.
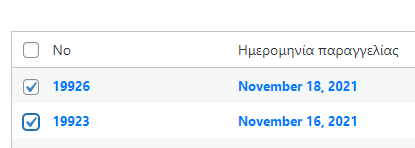
The “Log” displays in detail for the orders whether their invoices have been issued, whether emails have been sent to customers and possible errors that have occurred, during the order, either with the invoice or with the email sent to the customer.
5. Invoices
To enter the invoice management, we select from the list on the left “Invoices”. Immediately after, a new page will appear with the receipts that have been issued.
Similarly, with the invoice management, the possibility of filters is initially displayed, so that you can reduce the volume of results according to your search wishes. To do this, having added the parameters for the filters, as we analyzed in the previous section, select “Apply filter”.

In the results of the receipts, by clicking on a specific receipt in its details, a new page with the invoice file is displayed.
Then, on the receipts page you can see the log file for the receipts in the “Log”, i.e. the information in detail as well as the possible errors that have appeared during creation and during sending by email to the customer. Also, having selected one or more orders, by ticking the respective box, you can either send them to customers by email by clicking “Send to customer” or download them to your system by clicking “Download selected receipts”.